Upgrading the Contract
In this tutorial, you'll build off the work you previously did to implement the minting functionality on a skeleton smart contract. You got to the point where NFTs could be minted, however, the wallet had no way of displaying the tokens since your contract didn't implement the method that the wallet was trying to call.
Introduction
Today you'll learn about deploying patch fixes to smart contracts and you'll use that knowledge to implement the nft_tokens_for_owner function on the contract you deployed in the previous tutorial.
Upgrading contracts overview
Upgrading contracts, when done right, can be an immensely powerful tool. If done wrong, it can lead to a lot of headaches. It's important to distinguish between the code and state of a smart contract. When a contract is deployed on top of an existing contract, the only thing that changes is the code. The state will remain the same and that's where a lot of developer's issues come to fruition.
The NEAR Runtime will read the serialized state from disk and it will attempt to load it using the current contract code. When your code changes, it might not be able to figure out how to do this.
You need to strategically upgrade your contracts and make sure that the runtime will be able to read your current state with the new contract code. For more information about upgrading contracts and some best practices, see the NEAR SDK's upgrading contracts write-up.
Modifications to our contract
In order for the wallet to properly display your NFTs, you need to implement the nft_tokens_for_owner method. This will allow anyone to query for a paginated list of NFTs owned by a given account ID.
To accomplish this, let's break it down into some smaller subtasks. First, you need to get access to a list of all token IDs owned by a user. This information can be found in the tokensPerOwner data structure. Now that you have a set of token IDs, you need to convert them into JsonToken objects as that's what you'll be returning from the function.
Luckily, you wrote a function nft_token which takes a token ID and returns a JsonToken in the nft_core.ts file. As you can guess, in order to get a list of JsonToken objects, you would need to iterate through the token IDs owned by the user and then convert each token ID into a JsonToken and store that in a list.
As for the pagination, you can use some basic JavaScript to get that done. Let's move over to the enumeration.ts file and implement that logic:
Loading...
Redeploying the contract
Now that you've implemented the necessary logic for nft_tokens_for_owner, it's time to build and re-deploy the contract to your account. Using the build script, deploy the contract as you did in the previous tutorial:
yarn build && near deploy --wasmFile build/nft.wasm --accountId $NFT_CONTRACT_ID
This should output a warning saying that the account has a deployed contract and will ask if you'd like to proceed. Simply type y and hit enter.
This account already has a deployed contract [ AKJK7sCysrWrFZ976YVBnm6yzmJuKLzdAyssfzK9yLsa ]. Do you want to proceed? (y/n)
Once the contract has been redeployed, let's test and see if the state migrated correctly by running a simple view function:
near view $NFT_CONTRACT_ID nft_metadata
This should return an output similar to the following:
{ spec: 'nft-1.0.0', name: 'NFT Tutorial Contract', symbol: 'GOTEAM' }
Go team! At this point, you can now test and see if the new function you wrote works correctly. Let's query for the list of tokens that you own:
near view $NFT_CONTRACT_ID nft_tokens_for_owner '{"account_id": "'$NFT_CONTRACT_ID'", "limit": 5}'
Example response:
[
  {
    token_id: 'token-1',
    owner_id: 'goteam.examples.testnet',
    metadata: {
      title: 'My Non Fungible Team Token',
      description: 'The Team Most Certainly Goes :)',
      media: 'https://bafybeiftczwrtyr3k7a2k4vutd3amkwsmaqyhrdzlhvpt33dyjivufqusq.ipfs.dweb.link/goteam-gif.gif'
    }
  }
]
Viewing NFTs in the wallet
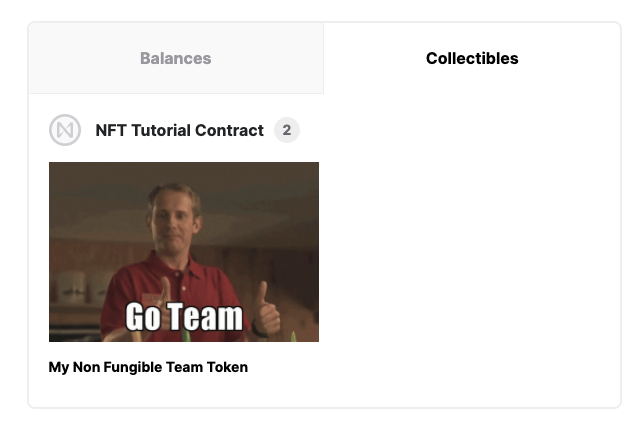
Now that your contract implements the necessary functions that the wallet uses to display NFTs, you should be able to see your tokens on display in the collectibles tab.

Conclusion
In this tutorial, you learned about the basics of upgrading contracts. Then, you implemented the necessary modifications to your smart contract and redeployed it. Finally you navigated to the wallet collectibles tab and viewed your NFTs.
In the next tutorial, you'll implement the remaining functions needed to complete the enumeration standard.
At the time of this writing, this example works with the following versions:
- near-cli:
3.0.0 - NFT standard: NEP171, version
1.0.0

